Microsoft 365 add-ins blocked

Today one of ´my colleagues had an issue on her customer laptop. The issue was that she was not able to use the “Open in Excel” funcitonality in Dynamics 365 for Operations and Supply Chain. Apparently someone had blocked the Office addin that was required to make it work.

There are 2 options to handle this… the easiest (and less secure) option is to allow the user to run and install Office Addins. The setting resides in the Office Admin Center and requires an Admin to change it. If some one has disabled it, go the Office Admin Portal – Setting – Org Setting – User owned apps and services and enable “Let users access the Office Store”

The second option is to provision the specific apps to the users that need them. This is also done by an admin in the Office Admin Portal.

In the Office Admin Portal, go to Settings, Integrated Apps and click Add-ins

Click Deploy Add-in

Click Next

Click Choose from the Store

Seach for Dynamics and click Add next to the Microsoft Dynamics Office Add-in

Click Continue

Now you will get the option to set which users will get the add.in deployed. You have the options of Everyone, an Azure AD Group (preferred) and just you. The last option is used for testing and you will later in the wizard get the option to change.

Note: If you are logged in ad Global Admin, that is the user that will get the add-in. You should preferably not use your “regular user” to manage your organizations infrastructure. If you are curious, google Tiering…
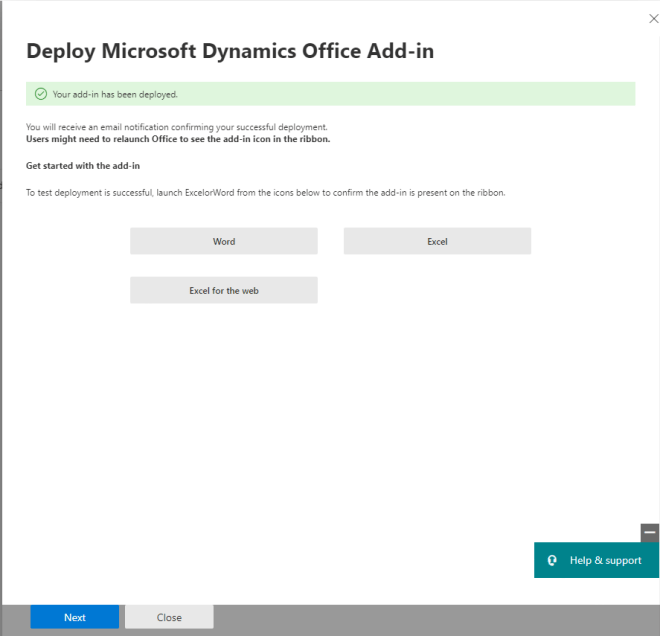
Verify that your deployment was successful

You are now done. If everything works, now you get another option to assign which users should get the app.

You can click on the add-in and adjust the deployment scope.

That is it… Good Luck

Links
Prevent add-in downloads by turning off the Office Store across all clients (Except Outlook)
Deploy add-ins in the Microsoft 365 admin center

Creating an App Password for a Azure AD Account using the Office 365 Portal

Most organizations today are using Azure AD and the absolute recommendation is to use 2FA in as many scenarios as possible… in some that is not possible… then there is an option to use an application password (this should be uses in special cases and you should never use it on an Admin Account). To create an App Password you do the following:

  • Log in to https://portal.office.com
  • In the upper right corner click your profile picture and select “My Account”
  • Go to “Security and Privacy” and click “Create and manage app passwords”

Note: If you are not able to see the Additional Security verification you can go directly to the link: https://account.activedirectory.windowsazure.com/AppPasswords.aspx … here you can create an app password.

  • To create a new app password click create

Links:
https://docs.microsoft.com/en-us/azure/active-directory/user-help/multi-factor-authentication-end-user-app-passwords
https://community.spiceworks.com/topic/2034065-issues-with-o365-app-passwords

Flow Friday: Sync selected Calendar items between calendars

The other day I thought I would make myself use Microsoft Flow more… the best way I could think of was to force my self to write a series of blog posts every week… that should work 🙂

My first post is a description on how to keep your partner happy (or at least happier) when you need to work late.

I keep two calendar, one personal and one for work, where I share my personal calendar with my wife in order for her to know what I am up to. When I need to work late or have an event at work I would like her to know (since I often forget to tell her). This flow adds all events in my work calendar that end after 17.00 to my personal calendar and it also sends an invite to my wife.

We start with the trigger that triggers on all new events. Then we converts the time to Swedish Time Zone (1) and then we check if the event “Show As” field is “Busy” (2)

If the event is not busy we simply terminate the flow, if it is Busy we first validate that End Time is later than 17.25 (3) and if it is we create a new event in personal calendar with the same settings where I invite my wife as an optional attendee (4).


Automation is King!!

/Johan

Links:
https://powerusers.microsoft.com/t5/Building-Flows/Help-with-ShowAs-in-a-condition/td-p/157937

Configuring Filtering in AADSync

If you don’t want to sync your entire Active Directory to Azure/Office 365 you can in the new AADSync set up a OU filter. Here is a short Checklist

  1. Start Synchronization Service Manager
    1. Go to Connectors
    2. Select Properties on your AD Connector
    3. Select Configure Directory Partitions
    4. Click Containers (Enter Credentials)
    5. Select OUs to Sync
    6. Exit Properties
  2. Initiate sync
    1. Right-click AD Connector and select Run – Full Import
    2. Right-click AD Connector and select Run – Delta Sync
    3. In Task Scheduler run the Azure AD Sync Scheduler or wait max of 3 hours
  3. Verify in Azure AD/Office 365 that the sync was OK…

Links
http://andersonpatricio.ca/how-to-force-the-synchronization-using-aadsync/
http://oddytee.wordpress.com/2014/09/24/configure-filtering-with-aadsync/

Filmer…

Jag har sedan en tid spelat in ett antal filmer för Microsofts räkning. Filmerna behandlar installation och konfiguration av utvalda funktioner i Windows Server 2012, Windows 8 och Microsofts Online tjänster… nu finns de på YouTube.

Windows Server 2012 – Översikt
Installera Windows 8 och nya Office i Windows Server 2012
Konfigurera Windows Server 2012
Installera Windows Server 2012
Konfigurera Windows Server 2012 för Remote Access
Konfigurera Hyper-V i Windows Server 2012
Installera Windows Server 2012 Essentials
Konfigurera Windows Server 2012 Essentials
Migrera från Small Business Server till Windows Server 2012 Essentials
Konfigurera Windows Backup
Konfigurera Azure
Konfigurera Office 365

Mvh

/Johan

SBS Essentials får äntligen sin Office 365 integration

Jag är mycket glad att kunna meddela att Microsoft äntligen släppt en beta av Office Integration Module som är en integrationsmodul mot Office 365.

Modulen är tänkt att förenkla administrationen av användare i SBS Essentials som använder Office 365.

För er som är intresserade kan ni hitta Betan på Microsoft Connect

Small Business Server Essentials 2011 – Migrering

Här kommer lite information angående migrering av Windows Small Business Server 2008 till Windows Small Business Server Essentials 2011 och Microsoft Office 365

Målet är att migrera en komplett SBS 2008 till SBS Essentials 2011 och även flytta Exchange och Sharepoint till Office 365

Checklista

Planering

För att din migrering skall gå bra krävs en viss planering. Fundera ut i vilken ordning momenten skall göras för att det skall gå så smidigt som möjligt. I mitt fall gör jag momenten i följande ordning:

  • Flytta Exchange, Sharepoint till Office 365
  • Installera nya servern och gör AD migreringen. Tänk på att dina 21 dagar börjar ticka.
  • Migrera servern och klienterna användarna skrivarna och data
  • Stäng ner servern ett tag för att vara säker på att allt rullar som det skall
  • Avinstallera Exchange på den gamla servern
  • Kör DCpromo på den gamla servern
  • Stäng ner den gamla servern

Office 365

  1. Skapa kundens Office 365 konto.
  2. Verifiera kundens domän i Office 365 (DNS ändringar tar tid)
  3. Migrera användare (tänk på att du anger korrekt användarplats)
  4. Starta migreringssynk av mailboxar
  5. Peka om MXpekaren och verifiera att det fungerar (DNS ändringar tar tid)
  6. Peka om användarna????
  7. Stoppa mailmigreringen
  8. Ta för säkerhets skull bort portforwarding i brandväggen för att förhindra inkommande mail
  9. Migrera Sharepoint (Manuellt eller tredjepart)

SBS Essentials

  1. Patcha den gamla servern
  2. Installera och kör Windows SBS 2008 Best Practice Analyzer – Åtgärda det som behöver åtgärdas
  3. Kontrollera SBS Konsolen och generera rapporter
  4. Utöka Schema för Active Directory
          Från installations CDn för SBS 2011 E i \support\adprep
          Kör adprep /forestprep för att utöka AD forest schemat
          Kör adprep /domainprep /gpprep för att utöka AD domän schemat
  5. Konfigurera tidssynk på den gamla servern (Viktigt för SBS migreringen)
       1: w32tm /config /syncfromflags:domhier /reliable:no /update

       2: net stop w32time

       3: net start w32time

  6. Verifiera forest och domain functional level. (Skall vara minst 2003)
  7. Skapa en migreringsfil för Small Business Server 2011

        [WinPE]
        [InitialConfiguration]
        AcceptEula=true
        CompanyName=InnoWorks AB
        ServerName=SBS2011E
        PlainTextPassword=Password01
        Settings=All
        Migration=true

    Spara filen som cfg.ini i roten på usbsticka och stoppa den i  den nya servern.

  8. Installera den nya servern. När det står “Your server is partially set up and is ready for you to start migration” startar migreringen.
  9. Konfigurera DNS på Small Business Server 2011 Essentials till att använda den gamla servern
  10. Ta backup och avinstallera Certifikatsservern på Small Business Server 2011 Essentials. Tänk på att ta med:
           Private key and CA certificate
           Certificate database and certificate
  11. Avinstallera Certifikatsservern Small Business Server 2011 Essentials
  12. Anslut servern till domänen och göra den till domänkontrollant

        C:\Dcpromo.ini

        [DCINSTALL]
        UserName=admin
        Password=Lösenord
        UserDomain=Domän.local
        DatabasePath=%systemroot%\ntds
        LogPath=%systemroot%\ntds
        SYSVOLPath=%systemroot%\sysvol
        SafeModeAdminPassword=Lösenord
        ConfirmGc=Yes
        InstallDNS=yes
        CreateDNSDelegation=No
        CriticalReplicationOnly=no
        ReplicaOrNewDomain=Replica
        ReplicaDomainDNSName=domän.local
        ReplicationSourceDC=gammalserver.domän.local
        RebootOnCompletion=No
        ApplicationPartitionsToReplicate=””*””;
       
        DCPROMO /unattend:”C:\dcpromo.ini”

  13. Verifiera att den nya servern är DC i domänen.
  14. Återinstallera Active Directory Certificate Services på Small Business

            Installera följande tjänster:
            – Certificate Autority
            – Certificate Authority Web Enrollment
           
            Installera CAn som:
            Standalone
            Root CA
           
            Verifiera att du valt:
            Use existing private key, Select a certificate and use its associated
            private key

            Välj det befintliga certifikatet

  15. Återställ Backup av CA
         Verifiera att du återställer:
         Private key and CA certificate
         Certificate database and certificate database log
       
         Verifiera under Properties – Extensions på CA servern att följande
         rutor är iklickade:

         Include in CRLs. Clients use this to find the Delta CRL location.
         Include in the CDP extension of issued certificates.

        för:
    http://<ServerDNSName>/CertEnroll/<CaName><CRLNAMESUFFIX><DELATACRLALLOWED>.crl

  16. Flytta FSMO till Small Business Server 2011 Essentials
       1: NETDOM QUERY FSMO

       2:  

       3: ntdsutil "activate instance NTDS" roles connections "connect to server SBS2011E.innoworks.local" q "transfer PDC" "transfer infrastructure master" "transfer naming master" "transfer RID master" "transfer schema master" q q

       4:  

       5: NETDOM QUERY FSMO

  17. Flytta Global Catalog till Small Business Server 2011 Essentials
  18. Ta bort Global Catalog från Small Business Server 2008
  19. Aktivera följande tjänster för UPnP på Small Business Server 2011 Essentials och sätt startuptype till Automatic:

            SSDP Discovery
            UPNP Device Host
            Windows Server UPNP Device Service

  20. Konfigurera om DNS på den nya servern till att använda 127.0.0.1.
  21. Skapa användargrupper.
       1: dsadd group cn=RA_AllowAddInAccess,ou=SBSUsers,ou=Users,ou=MyBusiness,dc=innoworks,dc=local

       2: dsadd group cn=RA_AllowComputerAccess,ou=SBSUsers,ou=Users,ou=MyBusiness,dc=innoworks,dc=local

       3: dsadd group cn=RA_AllowDashboardAccess,ou=SBSUsers,ou=Users,ou=MyBusiness,dc=innoworks,dc=local

       4: dsadd group cn=RA_AllowHomePageLinks,ou=SBSUsers,ou=Users,ou=MyBusiness,dc=innoworks,dc=local

       5: dsadd group cn=RA_AllowNetworkAlertAccess,ou=SBSUsers,ou=Users,ou=MyBusiness,dc=innoworks,dc=local

       6: dsadd group cn=RA_AllowRemoteAccess,ou=SBSUsers,ou=Users,ou=MyBusiness,dc=innoworks,dc=local

       7: dsadd group cn=RA_AllowShareAccess,ou=SBSUsers,ou=Users,ou=MyBusiness,dc=innoworks,dc=local

       8: dsadd group cn=WSSUsers,ou=SBSUsers,ou=Users,ou=MyBusiness,dc=innoworks,dc=local

  22. Lägg till admin i grupperna
       1: dsmod group "cn=RA_AllowAddInAccess,ou=SBSUsers,ou=Users,ou=MyBusiness,dc=innoworks,dc=local" "cn=RA_AllowComputerAccess,ou=SBSUsers,ou=Users,ou=MyBusiness,dc=innoworks,dc=local" "cn=RA_AllowDashboardAccess,ou=SBSUsers,ou=Users,ou=MyBusiness,dc=innoworks,dc=local" "cn=RA_AllowHomePageLinks,ou=SBSUsers,ou=Users,ou=MyBusiness,dc=innoworks,dc=local" "cn=RA_AllowNetworkAlertAccess,ou=SBSUsers,ou=Users,ou=MyBusiness,dc=innoworks,dc=local" "cn=RA_AllowRemoteAccess,ou=SBSUsers,ou=Users,ou=MyBusiness,dc=innoworks,dc=local" "cn=RA_AllowShareAccess,ou=SBSUsers,ou=Users,ou=MyBusiness,dc=innoworks,dc=local" -c -addmbr "cn=Admin Adminsson,ou=SBSUsers,ou=Users,ou=MyBusiness,dc=innoworks,dc=local"

  23. Importera användare till Small Business Server 2011 Essentials konsolen köra följande kommandon i C:\Program Files\Windows Server\Bin\WssPowerShell.exe:
       1: Import-WssUser –Name admin

       2: Import-WssUser –Name KalleKula

       3: Import-WssUser –Name NisseHult

  24. Importera den nya servern i konsolen köra följande kommando i     C:\Program Files\Windows Server\Bin\WssPowerShell.exe:

            Add-WssLocalMachineCert

  25. Anslut arbetsstationerna genom att surfa till http://servernamn/connect på respektive dator och köra guiden
  26. Kör kommandot gpresult /R och verifiera att datorn får sina policies från den nya servern.
  27. Migrera fildata till nya servern med Robocopy
       1: robocopy \\gammalserver\Share \\nyserver\Share /E /B /COPY:DATSOU /LOG:C:\log.txt

  28. Migrera skrivare med Print Management

Post Migration

  1. Peka om Port forwarding i brandväggen i den nya servern.
  2. Radera Mailboxar och Public Folders på den gamla servern genom att disabla alla mailboxar och kör sedan följande Powershell kommando:
       1: Get-MailboxStatistics –Database "Mailbox Database" | Where-Object {$_.DisconnectReason –eq "Disabled"} | ForEach {Remove-StoreMailbox –Database $_.database –identity $_.mailboxguid –MailboxState Disabled}

  3. Töm Public Folder med följande kommandon i Exchange Admin Console
       1: Get-PublicFolder -Server “SERVER NAME” “\” -Recurse -ResultSize:Unlimited | Remove-PublicFolder -Server “SERVER NAME” -Recurse -ErrorAction:SilentlyContinue

       2: Get-PublicFolder -Server “SERVER NAME” “\Non_Ipm_Subtree” -Recurse -ResultSize:Unlimited | Remove-PublicFolder -Server “SERVER NAME” -Recurse -ErrorAction:SilentlyContinue

       3: Get-PublicFolderStatistics -Server “SERVER NAME” | fl

  4. Ta bort Organization Configuration – Hub Transport – Send Connectors – Windows SBS Internet Send
  5. Avinstallera Exchange på den gamla servern.
  6. Kör DCpromo på den gamla servern.

Virtual Labs

Dokument

Videos

SBS och Autodiscovery

Sitter med en labbmiljö som kör SBS 2008 som jag skall migrera till Office 365. Det visar sig att Office 365 mailmigrering ställer en del krav på min Exchange. Det krävs t.ex att autodiscovery fungerar och för det krävs ett SAN Cert och jag tänker inte gå och köpa ett till min labbmiljö… Här kommer en kort guide för hur man skapar ett och installerar det i SBS 2008

  1. Gå till Digicert’s Exchange 2007 CSR Tool (finns även för Exchange 2010) och fyll i de uppgifter som behövs. Det är viktigt att Common Name är satt till remote.[DinDomän], annars kommer inte SBS att ge dig alternativet att välja detta cert under punkt 6. Ange sedan autodiscover.[DinDomän] under Subject Alternative Names.
  2. Klicka Generate så spottar den ur sig lite PowerShell som skapar en CertRequest från Exchange.
  3. Detta kommando kör du i en eleverad Exchange Management Console.
  4. PS kommandot genererar skapar en CSR fil som du skickar till ADCS mha kommandot certreq.exe -submit -attrib “CertificateTemplate:WebServer” c:\setup\cert_request.csr
  5. Du får nu ut ett certifikat som du importerar i CertMMCn för SBS2008 servern
  6. Starta SBS-konsolen och och kör guiden för att byta Certifikat där du väljer ditt nya cert.

Tack till Tommy för tipsen Blinkar

Links
https://www.testexchangeconnectivity.com
https://www.digicert.com/easy-csr/exchange2007.htm
https://www.digicert.com/easy-csr/exchange2010.htm
http://exchangeinbox.com/article.aspx?i=127

Sommarkollo

Jag har idag kört min första Sommarkollo dragning på Microsoft i Akalla och jag tänkte dagen till ära sätta upp en ny blogsite där jag kommer att samla mina tankar om lite allt möljigt.

Jag vill börja med att tacka de tappra som tillsammans med mig trotsade det fina vädret för att låsa in oss i ett konferensrum och lära oss om Windows Small Businesss Server 2011 Essentials on integration mot molntjänster.

Nedan finns en länk till den presentation jag körde på dragningen.

Tack än en gång alla som lyssnade

Ladda ner presentationen

/Johan