Delegating AD Admin Rights to regular users

I want to let regular user be able to administer users and computers in a specific OU.

There is a AD setting which allows any regular domain user to add a maximum of 10 Computers to the domain. This setting can be turned off like this:

  1. Start AdsiEdit.msc as Domain Admin
  2. Expand the Domain Node, right-click the DC=Domain node and select Properties
  3. Edit ms-DS-MachineAccountQuota and set it to 0

To set up the delegation do the following:

  1. In ADUC click view, Advanced Features
  2. Right-click on the OU where you want to add permission and select Properties
  3. On the Security Tab select Advanced and add the following permissions
    • To edit Users
      User Objects – Full Control
    • To Reset User Passwords Only
      User Objects – Read pwdLastSet
      User Objects – Write pwdLastSet
      User Objects – Reset Password
    • Add Computers
      This object and all child objects – Create Computer Objects
      This object and all child objects – Delete Computer Objects
    • Add Computers
      This object and all child objects – Create User Objects
      This object and all child objects – Delete User Objects

To add a computer to the domain the user first need to create a Computer Account in the Correct OU and then add the computer.

Links

http://www.infinitconsulting.com/news-events/technotes/limit-workstations.html

Set Site Links to Notification-Based Replication

Notification based replication will result in immediate replication between sites… remember that this will increase your replication traffic with 20-30%.

  1. Start  ADSIedit.msc and connect to the configuration container.
  2. Go to Inter-Site Transports – CN=IP.
  3. Right-click the site link object, and then click Properties.
  4. Select options.
  5. If the Value box shows <not set>, type 1. If the Value(s) box contains a value, you must 
    derive the new value by using a Boolean BITWISE-OR calculation on the old 
    value, as follows: old_value BITWISE-OR 1. For example, if the value in the 
    Value(s) box is 2, calculate 0010 OR 0001 to equal 0011. Type the integer 
    value of the result in the Edit Attribute box; for this example, the value 
    is 3.
  6. Click OK.


Links

http://blogs.technet.com/tmintner/archive/2006/04/12/425111.aspx

JRNL_WRAP_ERROR

You get this error in the eventlog:

The File Replication Service has detected that the replica set “DOMAIN SYSTEM VOLUME (SYSVOL SHARE)” is in JRNL_WRAP_ERROR.

Replica set name is    : “DOMAIN SYSTEM VOLUME (SYSVOL SHARE)”
Replica root path is   : “c:winntsysvoldomain”
Replica root volume is : “\.C:”
A Replica set hits JRNL_WRAP_ERROR when the record that it is trying to read from the NTFS USN journal is not found.  This can occur because of one of the following reasons.

[1] Volume “\.C:” has been formatted.
[2] The NTFS USN journal on volume “\.C:” has been deleted.
[3] The NTFS USN journal on volume “\.C:” has been truncated. Chkdsk can truncate the journal if it finds corrupt entries at the end of the journal.
[4] File Replication Service was not running on this computer for a long time.
[5] File Replication Service could not keep up with the rate of Disk IO activity on “\.C:”.
Setting the “Enable Journal Wrap Automatic Restore” registry parameter to 1 will cause the following recovery steps to be taken to automatically recover from this error state.
[1] At the first poll, which will occur in 5 minutes, this computer will be deleted from the replica set. If you do not want to wait 5 minutes, then run “net stop ntfrs” followed by “net start ntfrs” to restart the File Replication Service.
[2] At the poll following the deletion this computer will be re-added to the replica set. The re-addition will trigger a full tree sync for the replica set.

WARNING: During the recovery process data in the replica tree may be unavailable. You should reset the registry parameter described above to 0 to prevent automatic recovery from making the data unexpectedly unavailable if this error condition occurs again.

To change this registry parameter, run regedit.

Click on Start, Run and type regedit.

Expand HKEY_LOCAL_MACHINE.
Click down the key path:
   “SystemCurrentControlSetServicesNtFrsParameters”
Double click on the value name
   “Enable Journal Wrap Automatic Restore”
and update the value.
If the value name is not present you may add it with the New->DWORD Value function under the Edit Menu item. Type the value name exactly as shown above.


Do as it says and don’t forget to change it back

Working with CSV and AD

To export Contacts from AD to CSV use

CSVDE -F CONTACTS.CSV -R “(objectclass=contact)”

To import contacts from file:

CSVDE –I -F CONTACTS.CSV

To import with logging:

CSVDE –I -F CONTACTS.CSV –j c:

Note: User path for logfiles, not name of logfile.

Format of contact import file:

objectClass,displayName,DN,mailNickname,targetAddress,proxyAddresses,msExchPoliciesExcluded,mail

contact,Aaron Adams,”CN=Aaron Adams,OU=Category, OU=Distribution, DC=Domain, DC=com”, aadams, SMTP:aadams@domain.com,SMTP:aadams@domain.com,{26491CFC-9E50-4857-861B-0CB8DF22B5D7},aadams@domain.com

Links:

CSVDE:

http://support.microsoft.com/default.aspx/kb/327620

http://social.technet.microsoft.com/Forums/en-US/exchangesvradmin/thread/b5afac99-e684-4ee2-a830-7eb71a78ae12/

Great SCV Editor:

http://csved.sjfrancke.nl/index.html

EventID 1054: … Group Policy processing aborted.

When you login to a domain you get the following error:

Windows cannot obtain the domain controller name for your computer network. (The specified domain either does not exist or could not be contacted. ). Group Policy processing aborted.

and the GPOs are not applied.

Here is the solution:

Windows XP Service Pack 2

After you apply Windows XP Service Pack 2, you must add the GpNetworkStartTimeoutPolicyValueregistry entry. This entry defines the number of seconds to wait before trying to run the Group Policy startup script again. To find the value that will work for your configuration, define a decimal value of 60, and then increase the value until the problem is resolved. To add the registry entry and to define the value, follow these steps:

1.
Click Start, click Run, type regedit, and then click OK.

2.
Expand the following subkey:

HKEY_LOCAL_MACHINESOFTWAREMicrosoftWindows NTCurrentVersionWinlogon

3.
Right-click Winlogon, point to New, and then click DWORD Value.

4.
To name the new entry, type GpNetworkStartTimeoutPolicyValue, and then press ENTER.

5.
Right-click GpNetworkStartTimeoutPolicyValue, and then click Modify.

6.
Under Base, click Decimal.

7.
In the Value data box, type 60, and then click OK.

8.
Exit Registry Editor, and then restart the computer.

9.
If the Group Policy startup script does not run, increase the value of the GpNetworkStartTimeoutPolicyValueregistry entry.

Links

http://support.microsoft.com/kb/840669

Condensed Version of Implementing PKI on Win2003

Setting up a Stand-Alone Root CA

1. Install and patch a Windows Server 2003 and put it in a Workgroup
2. Prepare a CAPolicy.inf file and put it in %SystemRoot%
3. Install Certificate Services from the Install CD according to following

      – Stand-Alone Root CA
      – Use custom settings to generate the key pair and CA certificate 
      – Microsoft Strong Cryptographic Provider
      – Hash Algorithm: SHA-1
      – Key length: 4096
      – Clear Allow this CSP to interact with the desktop and Use an existing key 
      – Create Common Name and Distinguished name suffix
      – Validation Period: 10 years
      – Set Certificate database and Certificate database log
      – Store configuration information in a shared folder and enter a local Path

4. Verify the Root CA Certificate

      – certutil –ca.cert CommonName.cer
      – certutil.exe CommonName.cer

5. Verify the CommonName Configuration Information

      – certutil –cainfo
      – certutil –getreg | find /I Directory

Configuring the Root CA

1. Map the Namespace of Active Directory to an Offline CA’s Registry Configuration

      – certutil.exe –setreg caDSConfigDN CN=Configuration,DC=concorp,DC=contoso,DC=com

2. Configure CorporateRootCA Distribution Points for CRL and AIA (Look in the Source Document)
3. Finalize the CA Configuration

Source: Best Practices for Implementing a Microsoft Windows Server 2003 Public Key Infrastructure

FSMO Roles

FSMO (Flexible Single Master Operations)

Two good reasons for investigating FSMO

a) Curiosity to know how this Single master operation works

b) To know what to do if you lose one of the 5 vital roles.

Background information

For most Active Directory operations, Windows 2003 uses the multiple master model.  The benefit is you can add a computer, or change a user’s password on any domain controller.  For example, if you have three domain controllers, you can physically create a new computer in the NTDS.dit database on any of the three.  Five minutes later, the new computer object will be replicated to the other two domain controllers.

Technically, the multiple master model uses a change notification mechanism.  Occasionally problems arise with duplicate operations, and as a result orphaned objects appear in the ‘LostAndFound’ folder.  The point of FSMO is that a few operations are deemed so critical that only one domain controller can carry out that process.  Emulating a PDC is the most famous example of such a Single Master Operation; creating a new child domain would be another example.

In FSMO, the Flexible word simply means that you can move the role to a more suitable domain controller.

The five FSMO roles are:

  1. PDC Emulator – For NT 4.0 BDC’s.  But also for synchronizing time and creating group policies.
  2. RID Master – Each object must have a globally unique number.  The RID master makes sure each domain controller issues unique numbers when you create objects like users.
  3. Infrastructure Master – Responsible for checking Universal group membership in multiple domain forests.
  4. Domain Naming Master – Ensures that each child domain has a unique name.
  5. Schema Master – Operations that involve expanding user properties e.g. Exchange 2000 adds the mailbox property to users.

Three of the FSMO roles (1-3) are held in each domain, whilst two (4-5) are unique to the entire forest.

Changing the FSMO rolesFSMO Roles

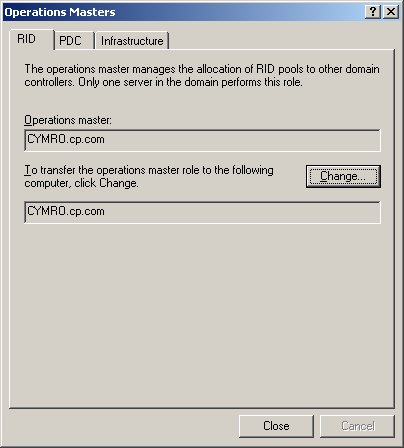
RID, PDC, Infrastructure (1. 2. and 3.)

You can plan a switch of Operation Master by using the Change button in the diagram right, taken from Active Directory Users and Computers, Right Click Domain, Properties, Operations Masters.

Domain Naming Master (4.)

To see the Domain Naming Master (4), check out Active Directory Domains and Trusts, Operations Master..

Schema Master (5.)

The Schema Master (5) is the most difficult FSMO to find.

1) Register the Schema Snap with this command: RUN regsvr32 schmmgmt.dll;

2) Run MMC, Add Remove Snap-in, Add Active Directory Schema

3) Select Active Directory Schema, Right Click, Operations Master.

If you ever run DCPROMO to demote a domain controller, watch out for a check box that says ‘This is the last domain controller in the domain’.  If that box is UNchecked the wizard will automatically move any FSMO roles to another domain controller.

Troubleshooting

If you find problems with domain controller connections timing out then:

a) Check DNS settings on the TCP/IP properties.

b) Check that all the FSMO servers are up and running.

c) Try this need command using NetDom:
    netdom query fsmo.

d) If you need a copy of netdom, check here.

Migration/Integrating Active Directory and NDS

Products

MIIS

MIIS 2003 Product Overview
Microsoft Identity Integration Server 2003 Frequently Asked Questions

Evaluation Download


Microsoft Windows Services for NetWare

Microsoft Windows Services for NetWare 5.03 Overview – Can be used for migration and Coexistence
Microsoft Windows Services for NetWare Component Summary
Services for NetWare 5.03 White Paper
Novell NetWare integration overview

Synchronizing Windows 2000 Active Directory with Novell Directories

Download – Available Free from Microsoft